
Zero to complete, a step-by-step guide to setting up an Express project from a vet
This is part of an ongoing series of articles for setting up a full client/server Express based node application.
- 0: Environment Setup, Eslint, Airbnb style guide, Prettier
- 1: Project Configuration, Node env vs Project env
- 2: Middleware, Logging: Winston & Morgan
- 3: Data Storage: Native Mongodb
- 4: Authentication: Middleware & Secure Cookies
- 5: Testing: Jest and Supertest
- 6: Code Documentation: JSDoc
- 7: Client JS bundling, Rollup
Code is available at github and is tagged at each stage of development.
Background
Any large project, and certainly one with multiple developers, benefits by having good documentation. The best part is that after adding comments to our code, we can automatically generate the documentation. We will do this both for our express server-side code, as well as our client-side js libraries.
JsDoc
We will use the popular JSDoc library and rimraf, a utility to clean directories. Install them via npm:
npm install jsdoc rimraf -DConfiguration
To start using JSDoc, we also need to configure how we will be using it. Create a configuration file in either .JS or .JSON format. Have a look at the JSDoc config page for details. I will use a basic js file, and export my configuration:
// jsdoc.config.js

module.exports = {
  tags: {
    allowUnknownTags: true,
    dictionaries: \['jsdoc', 'closure'\],
  },
  source: {
    include: \['controllers'\],
    includePattern: '.+\\\\.js(doc|x)?$',
  },
  opts: {
    template: 'node_modules/docdash',
    destination: 'docs/',
    recurse: true,
    verbose: true,
  },
};
The important parts of the file are telling JSDoc: what type of tags/annotations we will be using (you’ll see this in the next section), where our files are located and what extensions they will have, and last, where we want to output our generated documentation files.
Implementation
For JSDoc to understand the code: First, I will annotate the file as a module, then for each function I annotate relative details like privacy, the construct type, description, parameters, and the return type. You will follow a similar template for your own functions and can find all of them in the Block Tags section of the JSDoc webpage
Adding JSDoc comments to our users controller looks like this:
/**
* @module users
*/
const bcrypt = require("bcrypt");
const path = require("path");
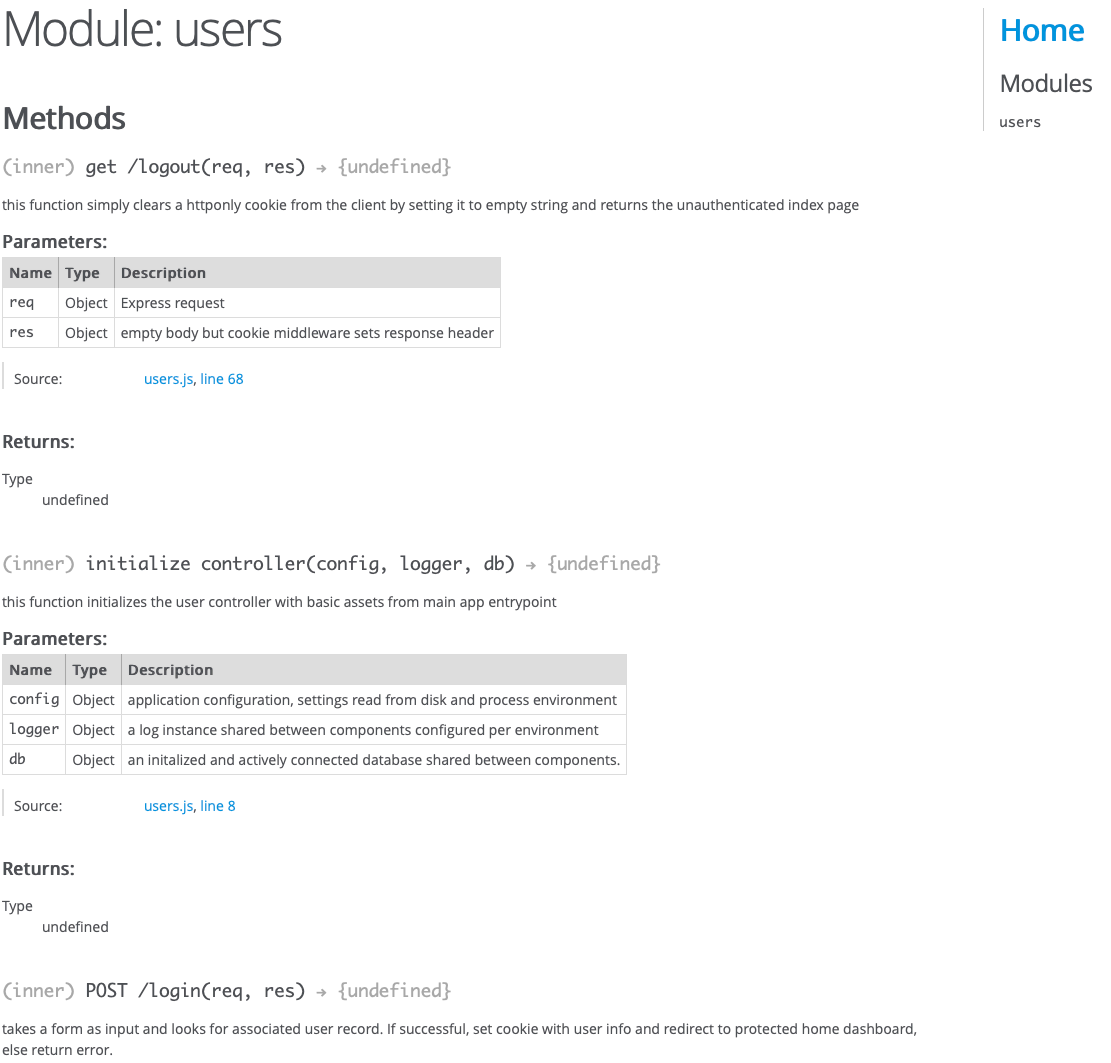
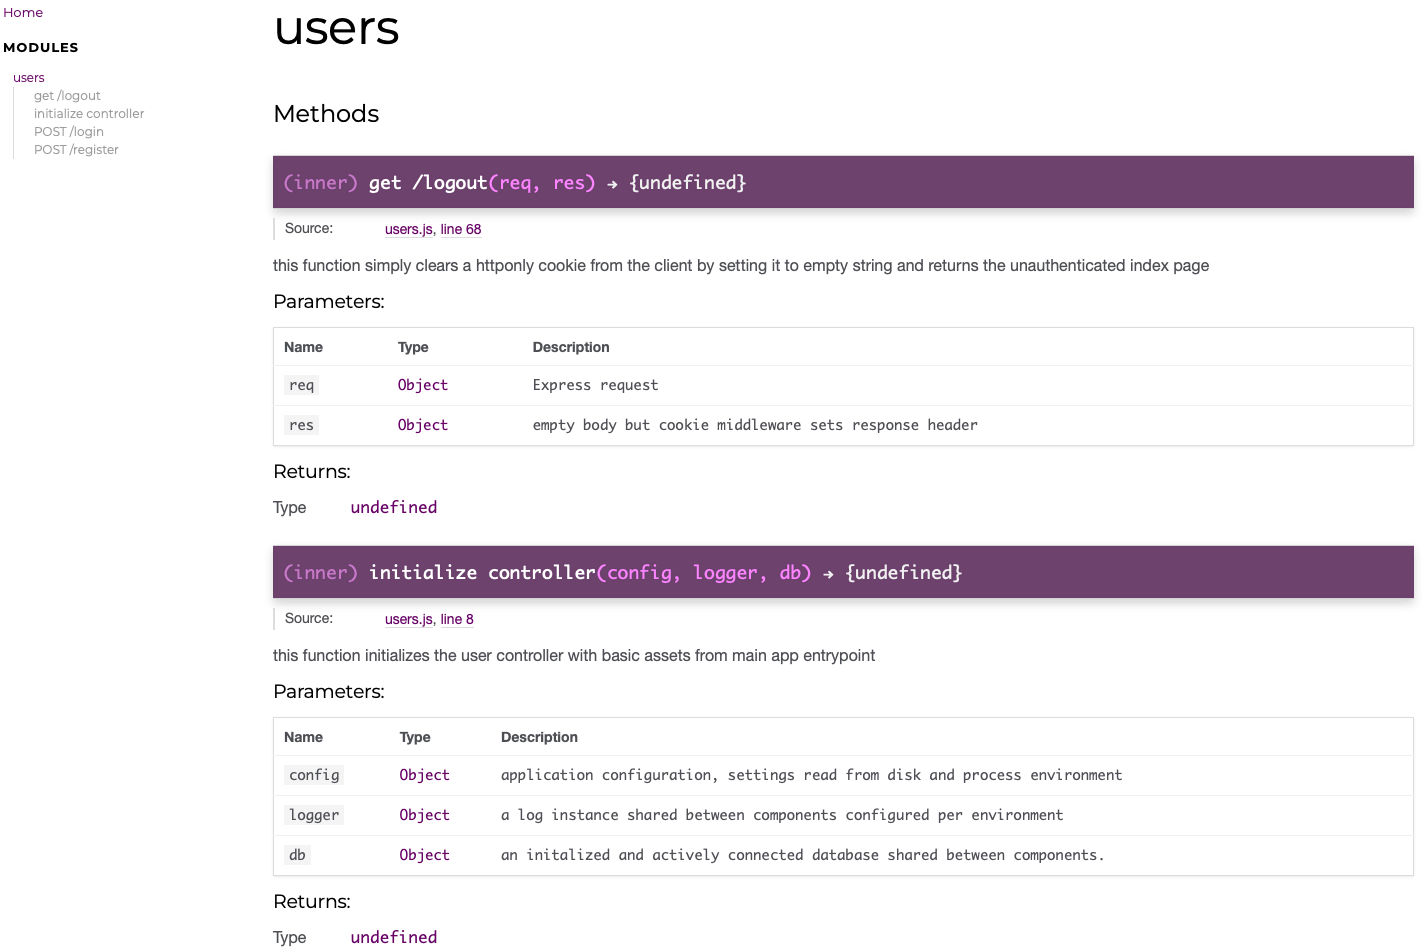
/**
* @public
* @function init * @name initialize controller
* @description this function initializes the user controller with basic assets from main app entrypoint
* @param {Object} config application configuration, settings read from disk and process environment
* @param {Object} logger a log instance shared between components configured per environment
* @param {Object} db an initalized and actively connected database shared between components.
* @returns {undefined}
*/
module.exports.init = async (config, logger, db) => {
this.config = config;
this.logger = logger;
this.userCol = db.collection("users");
};
/**
* @public
* @function login
* @name POST /login
* @description takes a form as input and looks for associated user record. If successful, set cookie with user info and redirect to protected home dashboard, else return error.
* @param {Object} req Express request with form elements in body of post
* @param {Object} res return set cookie and redirect or error message in json format
* @returns {undefined}
*/
module.exports.login = async (req, res) => {
const record = await this.userCol.findOne({ email: req.body.email });
if (record === null) {
res.status("401").json({ msg: `no record found with email ${req.body.email}` });
} else if (!bcrypt.compareSync(req.body.password, record.passHash)) {
res.status("403").json({ msg: "wrong password" });
} else {
req.session.ref = record._id.toString();
res.redirect("/home.html");
}
};
/**
* @public
* @function register
* @name POST /register
* @description takes a form as input and tries to create a new acct in the database, sets a client state cookie, and redirects to user dashboard. If db operation fails, return error message.
* @param {Object} req Express request with form elements in body of post
* @param {Object} res return set cookie and redirect to home.html, else error message in json format
* @returns {undefined}
*/
module.exports.register = async (req, res) => {
const user = {
email: req.body.email,
passHash: bcrypt.hashSync(req.body.password, bcrypt.genSaltSync(10)),
};
const ref = await this.userCol.insertOne(user);
if (!req.session) req.session = {};
req.session.ref = ref.insertedId.toString();
res.redirect("/home.html");
};
/**
* @public
* @function logout
* @name get /logout
* @description this function simply clears a httponly cookie from the client by setting it to empty string and returns the unauthenticated index page
* @param {Object} req Express request
* @param {Object} res empty body but cookie middleware sets response header
* @returns {undefined}
*/
module.exports.logout = async (req, res) => {
req.session = null;
res.sendFile(path.join(req.app.locals.projDir, "/client/index.html"));
};Output Docs
With the JSDoc module installed, configured, and now implemented in our JS file, we can generate our docs.
In your package.json file, add the script action to clean the doc directory and invoke JSDoc:
"docs": "rimraf docs && jsdoc -c jsdoc.config.js"Assuming no errors, you will see a docs directory created which contains files for a webpage which has documentation for your code.
Here’s a screenshot of the document index:
Bonus
If you are like me and would like a better looking layout than the default JSDoc one, you can use a custom template which defines alternate layouts. There are a few here, personally I typically use docdash which has lots of github stars and is regularly updated.
npm install docdash -DIn your configuration, add the line: “template”: “node_modules/docdash”, to the ops section:
opts: {
  template: 'node_modules/docdash',
  destination: 'docs/',
  recurse: true,
  verbose: true,
},
Run the “npm run docs” command again and look at the docs generated. You’ll see a layout with a left menu of your modules.
You can find the changes documented above since the last post on github here.
Next, we will look at ways to “bundle” or build and optimize our resources to be ready for distribution using a tool called Rollup.